Edmunds dealer partner, Bayway Leasing, is now offering transparent lease deals via these forums. Click here to see the latest vehicles!
How To Change Your Brake Pads
 Edmunds.com
Member, Administrator, Moderator Posts: 10,315
Edmunds.com
Member, Administrator, Moderator Posts: 10,315
 How To Change Your Brake Pads
Changing disc brake pads yourself is fast, easy and can save you $250 or more.
Tagged:
0
Comments
I will browse for more of your "how to" articles so that I can discover more on how to remove and reinstall other car accessories.
Verlauf: There should be no need to bleed the brakes since the level will not be replaced. As mentioned in the article, if the fluid has been "topped off" by some mechanic, it might spill over the top of the master cylinder when the piston is pushed back. As "Editit" points out in Step 8, a catch container or rags under the master cylinder will help to minimize the mess.
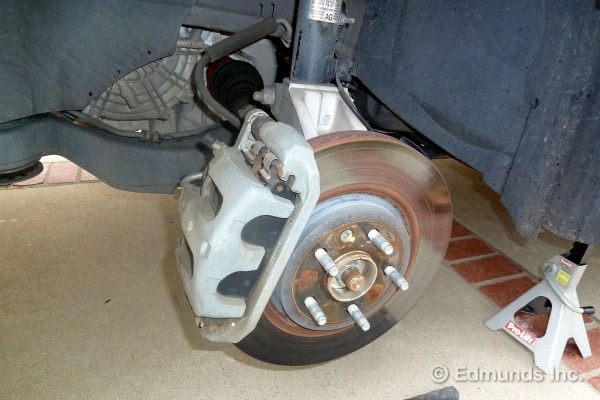
Cort2: In Step 2 we say to locate the two slider bolts but REMOVE only the lower bolt. The caliper will rotate up on the top bolt. A socket wrench is used in the picture. But you can use an open end wrench or even an adjustable wrench.
Richardw1: I'm a little concerned that your 1978 Sable has rear drum brakes which are constructed differently than disc brakes. Compare your Sable brakes to the pictures here to see if they match. If they do, make sure you are pressing in on the piston with either a C-Clamp or a pry bar in the fashion shown in Step 9.
Philip Reed, Edmunds.com Senior Consumer Advice Editor
A few notes to consider before you try and do your brakes yourself.
What is displayed here is commonly referred to as a "Pad Slap", or "Pad Slapping". There are a few occasions where brakes can be properly serviced by simply replacing the pads, however the emphasis on the word "few" is not to be taken lightly. If a new student came to a tech school and his/her experience with doing a brake relign amounted to the routine as described above, then he/she would not be doing brake repairs for a customer without direct supervision. Pad slaps are the number one reason for consumer complaints and come backs for shops, in fact more than 50% of attempted pad slaps result in a dissatisfied customer.
While doing an entire brakes class is out of the question for this format, some of the steps not mentioned are checking for run -out and rotor thickness variation, both important considerations to ensure the brakes don't pulsate and cuase a handling issue. At the same time the rotor thickness must be measured to see if it is still within serviceable limits. Too thin and it must be replaced.
The caliper slides and brake pad support surfaces must be serviced to ensure the pads are free to move with the application of the brakes. That by the way is impossible to do correctly without completly removing the caliper from the bracket, as well as the bracket from the knuckle. If this step is skipped the common result is dragging brakes, and/or tapered wear and premature failure of the new brake pads.
The last portion to be considered is the retraction of the piston(s) in the caliper. Needing to use a lot of force to do that as potentially demonstrated in the above description again often leads to dragging brakes which while not only risks overheating them and ultimately brake fade. It can cause short pad life, and of poor fuel economy as the engine now has to struggle against that additional resistance to the car traveling down the road. It's also adviseable for the technician to start pushing the piston back and take note of the effort that is required, then open the bleeder screw and now push the piston all the way back while removing that old fluid from the system. Any debris from corrosion or failing components typically migrates to the lowest portion of the system, this debris will be disturbed when the piston is pushed back into the caliper bore, and can cause failures in the ABS hydraulic controller or master cylinder. By discharging the fluid any disturbed debris gets ejected from the system instead of forced back upstream. This also makes for a very convenient time to replace the brake fluid, which is something that is often overlooked and worthy of it's own article to explain why.
Not even the most simple and safest aspect of proper torque (bolts and wheel lugs) was mentioned.
Slider bolts need to be inspected and may have to be replaced. Also, proper technique per manufacturers manual is to use bolt lock like Loctite.
So as silly as this sounds, when i buy rotors (for a 2005 dodge grand caravan), do the rotors come in sets of 2 or do i have to buy them separately? and do that go for all the brakes parts? My front right side brake pad is COMPLETELY GONE...i hear metal and it's loud. The van has been sitting for 11 months (for financial reasons) but i will have it on the road by mid March...so i wanted to know if all of what i need to buy to replace the entire brake system. can you please help.
Brook | [non-permissible content removed]
What was the piece of string for? I can’t find it anywhere